A familiar pattern, a fresh listening task
A scale may be one of the first things you learn at the piano, but it gives you plenty to return to. One day you can listen for the thumb crossing; another day, for a quiet LH or a crescendo that grows over the whole line. The notes stay familiar while your attention becomes more exact.
Our aim: connect knowledge of a key with an even, comfortable route across the keyboard. Begin with a range you know, then learn how continuation fingers carry the line through two and four octaves. You need not rehearse every possible length before making music with it.
A pianist’s perspective · Lang Lang
Lang Lang chose the C-major scale for the first video in his public Lang Lang Lessons series. It is a friendly reminder that familiar material can still deserve a great pianist’s attention. For your next pass, keep the key you know and choose one new thing to hear. Lang Lang Lesson 1, official artist channel.
Find your starting point
If one octave is still uncertain, begin with the first example and learn each hand’s route. If that feels comfortable, move on to the continuation lesson. The four-octave reference is there when you are ready for a longer line.
Listen for an even pulse, an unforced change of position, and a chosen dynamic. A thumb crossing should sound like part of the phrase—not an announcement that the thumb has arrived.
Carry the work into Mozart
Chapter 57 uses the opening of K.332’s finale to show how scale motion combines with chromatic neighbors and changes of direction. Work on a small connection here, then hear what it makes possible in that phrase. Appendix A gathers the complete major-key reference so you can explore another key without starting the lesson again.
1. One octave: establish the route
Purpose: play a connected line without a bump when the thumb changes position. Begin with C major, one hand at a time. The right hand starts on middle C; the left starts an octave below.
Play two eighth notes per beat, initially around quarter note = 50–60 if that is comfortable. Let the hand travel along the keyboard rather than keeping it anchored over its first five notes. Do not accent a note just because it is played by the thumb.
Locate the crossings
Ascending RH: E–F uses 3–1. Ascending LH: G–A uses 1–3. On the return, RH F–E uses 1–3 and LH A–G uses 3–1. These events happen at different places in the two hands.
- Play the three notes around one crossing slowly. Prepare the thumb while the preceding finger is still playing, and let the hand and forearm travel toward the next group. A small comfortable wrist adjustment may help; avoid a deep sideways bend or forcing the thumb far underneath a stationary palm.
- Continue through the crossing into the next group; avoid pausing on the thumb.
- Play the full octave, then reverse at the top without repeating the top C.
- Put the hands together only when each route feels predictable.
Listen for: the crossing note has the same length and volume as its neighbors. Record one ascent and descent if the bump is difficult to hear while playing.
If the thumb note bumps, play it quietly by itself, then join the preceding and following notes at that same level. Use a small D–E–F–G group in the RH and F–G–A–B in the LH. Increase speed only while timing and volume stay even.
2. Extend the route without changing its purpose
The first and last fingers belong to the ends of a run. At an internal tonic, continue rather than using a terminal finger: ascending RH B–C–D = 4–1–2; ascending LH B–C–D = 2–1–4. Two, three, and four octaves use the same continuation principle.
Use the four-octave reference to locate these crossings. Begin with a shorter portion and its return before extending the range; separate full engravings of every octave length are unnecessary. The top C uses RH 5 and LH 1, while the final low C uses RH 1 and LH 5.
Three passes through a chosen range
- Route: play hands separately and check the fingers around each internal tonic.
- Pulse: join hands without pausing where one octave becomes the next.
- Phrase: make one gentle rise and fall in sound without changing note lengths.
Let the quality of the line tell you when to add range. If a longer run keeps interrupting its pulse, spend a little time with the crossing before adding another octave. Return to equal, unaccented notes after any practice variation.
Reference policy: this chapter teaches range extension once. The developed key reference will use a principal long-range version for each key, with extra examples only where the fingering or coordination changes. The reference appendices collect key patterns in one place; these selected examples teach specific fingering differences.
3. Four octaves: one continuous route
Think of the four octaves as one long phrase, with time to hear its shape. Start RH on C below middle C and LH one octave lower. Four sixteenth notes fit each beat. Choose a tempo that permits even movement; the smaller note values do not require fast playing.
The 8va line means sound those RH notes an octave above their written position. Clef changes and the octave sign keep the actual four-octave run readable; they do not change its route. Turn once at the highest C, without repeating it.
Practice two octaves first, then add one octave at a time. Listen across each internal tonic: RH continues with 1 and LH with 1. Reserve RH 5 for the top and LH 5 for the bottom. If a crossing interrupts the pulse, shorten the run before increasing the tempo.
4. G and F major: notice what changes
G and F are the first keys on either side of C in the circle of fifths: each adds just one key-signature accidental. G preserves the familiar finger sequence; F introduces a useful RH exception.
G major adds F♯ but keeps the C-major one-octave finger sequence.
F major adds B♭ and changes the right-hand route. Use finger 4 on B♭ and the thumb on C. The upper F ends with RH 4 rather than 5.
Compare before repeating
Name the key signature, find the black key, then play one hand slowly. In F major, check A–B♭–C = 3–4–1 in the right hand. The left hand keeps the familiar 5–4–3–2–1–3–2–1 ascent.
Alternate C, G, and F rather than repeating only the easiest key. Later, try long–short and short–long pairs, then return to equal notes to check that the variation has improved control.
Repertoire connection: the scale passages in Mozart’s K.545 first movement make the same demand: continuous motion through crossings. The scale-technique repertoire chapter includes an excerpt.
Fingerings: conventional scale fingerings, consistent with the existing Cadenza reference. They are not invented by an automatic fingering algorithm.
5. D and B♭ major: two different routes
D and B♭ each have two key-signature accidentals, but use different finger routes. D retains the familiar C-major sequence; B♭ begins on a black key and needs a different RH continuation finger.
Register: the hands begin one octave apart, as in the introductory C-major example. Follow the printed registers and ledger lines; the fingering does not change with register.
Practice check: give yourself a moment before starting to name where each thumb will next land. A little preparation can make the first attempt much less of a search. Then play the full run without a pause at the internal tonic. In D, RH uses 1 at the internal tonic and 5 at the top. In B♭, the printed RH starts with 2, uses 4 on later B♭s, and returns to 2 only at the bottom. LH uses 3 on B♭. Descend using the written fingers rather than restarting a one-octave pattern at the summit.
6. A and E major: retain fingers, change the map
A major adds G♯ to D major’s two sharps. E major adds D♯ as well. The thumb still lands on white keys in these examples; the fingers that lead into it must find their new black-key positions.
An 8va line in the LH keeps the high passage readable in bass clef: sound those written notes one octave higher until the line ends.
Try G–D–A–E over four sessions, then select one of the four without playing the preceding keys first. Before each run, name the key signature and play its altered notes alone. This separates recall of the keyboard map from the motion of the scale.
Listen for: black-key notes have the same timing and volume as white-key notes. If one becomes an accent, practice the surrounding three-note group and return to the complete phrase. These keys share fingers; that does not mean every major key does. F major already illustrates a different RH route, and other exceptions will be treated individually.
7. Rotate keys around the circle of fifths
Try C–G–D–A–E–B–F♯/G♭–D♭–A♭–E♭–B♭–F, then return to C. Adjacent keys differ by one key-signature accidental, using an enharmonic change halfway around. This gives your practice a systematic route through every key.
Pair each major key with its relative minor: C/A minor, G/E minor, D/B minor, and so on. Relative major and natural minor share a key signature but have different tonics; harmonic and melodic minor alter some of those notes. Compare the sound and fingering rather than assuming they stay the same.
One or two pairs can be enough for a session: leave time to hear their different characters. Once they feel familiar, mix the order so each key can be recalled independently.
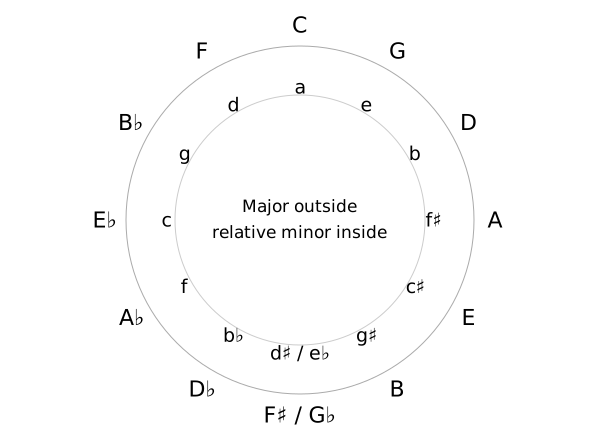
Finding the relative minor
The relative minor’s tonic is the sixth degree of the major scale: count C–D–E–F–G–A to find A minor. A parallel minor has the same tonic as its major, such as C major and C minor; it is a different relationship.
For an early session, compare C major with A natural minor. On another day, try G major with E natural minor. Listen to how beginning and ending on the minor tonic changes the sense of arrival even though the key signature is shared. Use the minor chapter’s A-minor example as a starting point; the shared key signature alone does not determine the fingers.